In this example we take a look at the TLV493D magnetic sensor to a Raspberry Pi 4
Description
The 3D magnetic sensor TLV493D offers accurate three-dimensional sensing with extremely low power consumption in a small 6-pin package.
With its magnetic field detection in x, y, and z-direction the sensor reliably measures three dimensional, linear and rotation movements.
Applications include joysticks, control elements (white goods, multifunction knops), or electric meters (anti tampering) and any other application that requires accurate angular measurements or low power consumptions.
Features
• 3D magnetic sensing
• Very low power consumption = 10 µA during operations (10 Hz, typ.)
• Power down mode with 7 nA power consumption
• Digital output via 2-wire based standard I2C interface up to 1 MBit/sec
• 12-bit data resolution for each measurement direction
• Bx, By and Bz linear field measurement up to +130 mT
• Excellent matching of X/Y measurement for accurate angle sensing
• Variable update frequencies and power modes (configurable during operation)
• Supply voltage range = 2.8 V…3.5 V, Temperature range Tj = -40°C…125°C
• Triggering by external µC possible
• Interrupt signal available to wake up a microcontroller
• Temperature measurement
Parts Required
Various parts used in this example
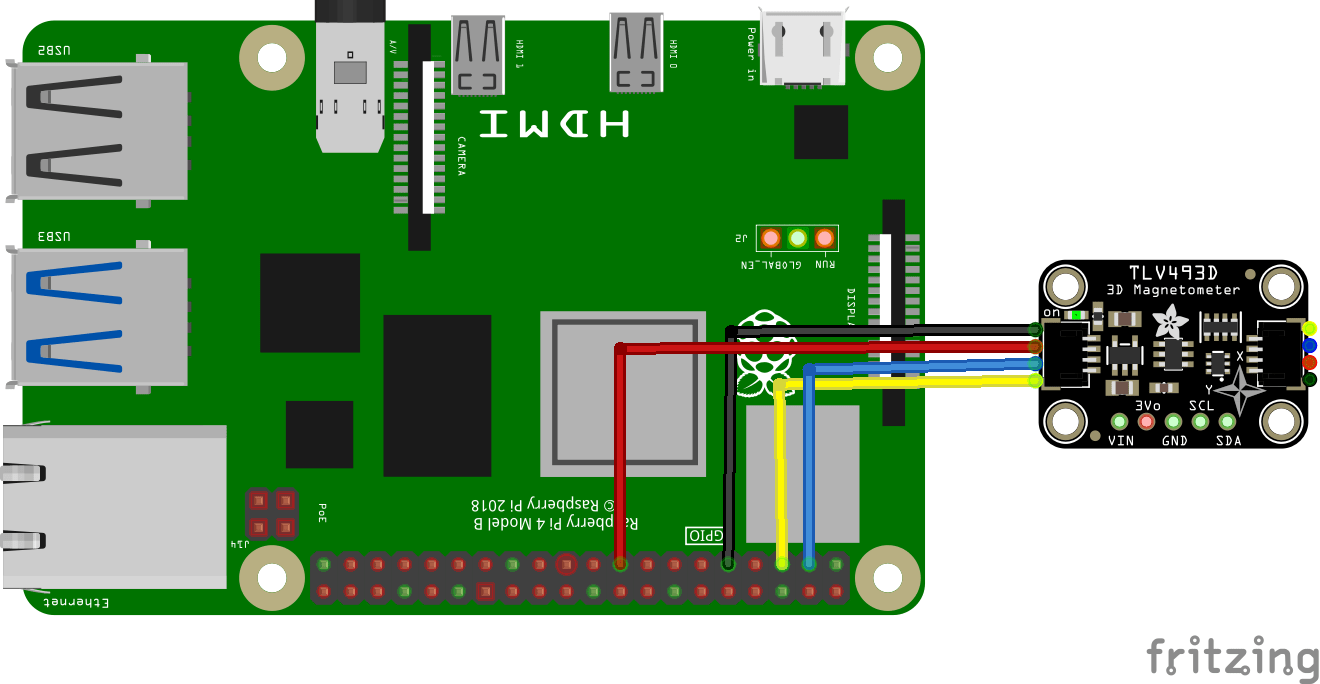
Schematic/Connection
I connected the TLV493Dto the Raspberry Pi 4 like this, an I2C sensor so fairly straightforward
Installation
This is the library from https://github.com/Infineon/RaspberryPi_TLV
Supported hardware –> Raspberry pi Zero/3/3B+/4B
- Update apt
sudo apt update
- Enable i2c (Interfacing options menu and then I2C enable). For detailed steps see this article.
sudo raspi-config
- Install pip3
sudo apt install python3-pip
- Install smbus
pip3 install smbus
sudo apt-get install -y python-smbus i2c-tools
Installing from PyPI
On supported GNU/Linux systems like the Raspberry Pi, you can install the driver from PyPI
For current user:
pip3 install TLV493D
To install system-wide (this may be required in some cases):
sudo pip3 install TLV493D
Code Example
I used Thonny for development and the library from above
And here is the code example for the above library
[codesyntax lang=”python”]
import TLV

from time import sleep

tlv493d = TLV.TLV493D()

while True:
    tlv493d.update_data()
    x = tlv493d.get_x()
    y = tlv493d.get_y()
    z = tlv493d.get_z()

    print("x: ", x, "y: ", y, "z: ",z)
    sleep(0.5)
[/codesyntax]
Output
Run this example in Thonny and you will see something like this in the Shell window
%Run tlv493d.py
x: -1.568 y: 0.0 z: 0.0
x: -1.568 y: 0.0 z: -1.568
x: -1.568 y: 0.0 z: 0.0
x: 0.098 y: 0.196 z: 0.098
x: -1.568 y: 0.196 z: -1.568
x: 0.0 y: 0.098 z: 0.0
x: 0.0 y: 0.0 z: 0.0


